Wednesday 25 May 2016

how to take driver backup

when we formatting the harddisk in our computer to put another os put again the os we format the whole c partion there are some problem to us when we format the c disk ,we lose the data that are saved in my documents,my pictures,my music,downloads or any exe file that are installed in computer and also the drivers n our computers which are more essential using the computers when we use a game aor playing a video or listening the audio in the computer here is the way to back up the drivers that are installed in the computer

How To Backup Drivers Before Formatting Windows 7

There are two ways to perform Windows 7® driver backup, either manually or using the additional driver backup tools (we use DriverMax here because it is very easy to use with just one click).

1. How to Manually Backup Windows 7® Drivers

Drivers on all versions of Windows® are stored in the folder C:\Windows\System32 in the sub-folders DriversDriverStore and DRVSTORE (if any).
Manual Backup Drivers Windows
For a manual backup, simply copy the three folders and save them on an external USB data storage drive.

2. How to Backup Drivers Windows 7 Using DriverMax

  1. Install DriverMax first, you can download. (read: Our DriverMax review)
  2. Open DriverMax Tools -> Driver backup and restore -> Backup drivers.
    Backup Drivers Windows Using DriverMax
    Backup Drivers Windows Using DriverMax
  3. You have the option to Backup All Drivers, Backup Selected Drivers, or Backup Driver to the specific folder.
  4. Copy the backup files from DriverMax to an external USB data storage drive.
DriverMax free version has limited features, for complete you need buy drivermax pro.

How To Backup Drivers Before Reinstalling Windows 7 (Video)

If video not playing see on YouTube

Conclusion

To backup windows drivers can be done manually or using the software.
Manual Backup is by copying folder that contains the driver files (.sys), driver setup files (Inf), pre-compiled INF files (.pnf), and an XML manifest file that contains the manifest of all the files within the driver package.

Backing up by using software like DriverMax will make it easier for you the next time you are finished restoring drivers after re-install windows with 1 click restore.

 Backing Up Drivers with Double Driver

Double Driver is a popular freeware tool that allows you to view, backup and restore all drivers installed on your computer. It is a much faster option than downloading each driver individually, but may not work in case of a few drivers (although this is rare). For most purposes, I recommend that you use this tool .
Step 1
Download a copy of Double Driver. You can find one from Download.com here.
Step 2
Unzip the downloaded file in a folder on your desktop.
Step 3
You should see two executable files in the desktop – dd.exe and ddc.exe
Both dd.exe and ddc.exe perform the same function. However, the latter runs from the command prompt and requires a higher degree of technical know-how to operate.
For this tutorial, we will run the dd.exe file, which offers a much easier to use graphical user interface.
Keep the ddc.exe file handy though. In case you can’t boot up your computer but have access to the command prompt, you can use it to backup and restore drivers.
Step 4
After running the dd.exe file, you should see a window like the one shown below (Windows may show a security warning; ignore it):
Click on ‘Backup’. On the next window, click on ‘Scan Current System’.
Double Driver will quickly scan your system for existing drivers. Depending on your system, this list may include hundreds of drivers. Double Driver will automatically pre-select critical drivers, though it’s always a good idea to go through the list and select any driver Double Driver may have missed.
Once done, click on the ‘Backup Now’ button.
You’ll now be asked to specify the location for the backup. You can either save them to an external drive or your internal hard drive. In case of the latter, I recommend that you use non-system partition (i.e. a partition where no Windows system files are installed).
You can also select how you want to save the drivers. For most purposes, the default structured folder format is good enough.
Hit OK. Your drivers have now been saved! You can now access them whenever you reinstall Windows
.

How to reinstall a driver from backup

There's 2 ways to do it. Note that both cases require you point to the device driver's INF file (this is the driver's Installation Setup File required by Windows)
  1. If the Add New Hardware Wizard pops-up, point it to the folder containing the device folder backup
    > This folder will include the device driver's INF file
    > The Hardware Wizard should see the INF file and then load the driver. You may need to reboot to complete device installation
  2. Or, to install a driver manually, just go directly to the device driver's backup folder, rt click the INF file, select Install then reboot. Windows should redetect the device hardware and complete the driver install
A subtle detail to note!
  • Usually, when you download a driver you see it as an executable (EXE file). The EXE file may contain more then just the device driver! e.g. it might include application software. This is often the case for Graphics and Audio drivers.
Example: A good example is ATI graphic's Catalyst Control Center. This is an application, not a driver, that is installed with the EXE
  • DoubleDriver only backs up the device driver itself - not application level software. This should still be enough to, at least, get your device working again
  • You may still need to locate the driver EXE file to restore full functionality for some devices (e.g. its applications)

Tuesday 24 May 2016

your external device doesnt show up the files

dear blog readers  ,,,,
everybody now a days use many eletronic devices like computer ,memory card, pen-drives , external hard disks etc. the major problem while handling these external storage devices are memory loss ,data corrputed ,virus and many more i have given a procedure to regain the data from these external devices so that the lost or hidden files which does not show files when connected in computer but shows up when we  plugged into soime computer or phone....
Try this 1. 

Check whether the files are not in hidden mode. Follow the following steps. 

for a memory card

Step 1
Insert your memory card into a USB memory card reader. Plug the data cable for the USB adapter into a USB port on your computer. Windows automatically recognizes the device and assigns a drive letter to it. Double-click on the drive letter that Windows assigned to the device. If you can access your data, the card is working.
Step 2
Click the Windows orb on your taskbar, if nothing happens or you receive an error message when you double-click the card's drive letter. Type “run” (without the quotes here and in subsequent commands) in the “Search programs and files” text box. Click the "OK" button to open the Run pop-up box. Type “cmd" in the text box and click on the "OK" button to bring up a command prompt box. Type the "chkdsk" command and specify the drive letter to check, followed by "/r." The resulting command will look like this example: chkdsk e: /r. Press "Enter" to execute the command and check the memory card for errors.
Step 3
Wait until the "chkdsk" program finishes checking your memory card for structure corruption. Press the letter “Y” on your keyboard to allow the program to continue checking, until you recognize the files and directories that you have saved on the memory card. When "chkdsk" is finished checking the memory card, you're prompted to save lost chains into files. Click the “Yes” option. In a few moments, "chkdsk" will display all of your lost data files that have been repaired on your computer.
Step 4
Switch to the desktop and double-click on “Computer,” and then click on the drive letter that Windows assigned to the memory card. All of the files that were repaired will be visible, and you'll be able to access them again on the memory card.
Step 5
Remove the memory card from the memory card adapter. Unplug the data cable to the memory card adapter from the USB port on your computer. Insert the memory card into the mobile device that you normally use to access the files on it.

Things Needed

  • USB memory card reader

for a external devices

Step 1: 

Click on the below link and download the file "AutorunExterminator" 

http://ccm.net/download/download-11613-autorun-exterminator 

Extract it --> Double-click on "AutorunExterminator" --> Plug your Memory Card now. 

This will remove the autorun.inf files from your Memory Card and also from 

the drives. 

Step 2: 

Click on "Start" -->Run --> type cmd and click on OK. 

Here I assume your Memory Card as G: 

Enter this command. 

attrib -h -r -s /s /d g:\*.* 

You can copy the above command --> Right-click in the Command Prompt and 

paste it. 

Note : Replace the letter g with your Memory Card letter. 

Now check for your files in Memory Card. 

Step 3: 

After that, download the Malwarebytes' Anti-Malware from the below link 

http://ccm.net/download/download-105-malwarebytes-anti-malware 

Update it --> Perform "Full Scan" 

Note : Default selected option is "Quick Scan". 

Good Luck.
What happened to their files/folders?
Apparently, there’s some kind of virus that’s found its way to our USB sticks, laptops etc and therefore to our phones. The virus hides the files, and the regular “Show Hidden Folders” Option in Windows would not un-hide these files/folders. (Of course, that’s a regular guy’s explanation)
How to recover the files/folders?
  1. Connect the device in USB mode. (Note the Drive letter of the infected drive)
  2. Go to Start > Run > (Windows Button + R) then type cmd
  3. The MSDOS prompt shows, then type the drive letter you noted earlier, e.g E: and press enter.
  4. The MSDOS should show E:\> by now, So, go ahead and type attrib -S -H /S /D * and press enter
  5. Type exit and VOILA! All your files are back
Please note, the above command will un-hide all your files. Both System files and Hidden files. This is so because;
 The ‘-‘ in the command is used to clear an attribute
 The ‘S’ is the System File attribute
 The ‘H’ is the Hidden File attribute
/S processes files in all directories in the disk
/D process folders in the disk
Therefore, -S would clear all System File attribute and –H would clear all Hidden File attribute (at this stage, you don’t care any longer, because you have your lost but found files already, and you’ve probably closed this page. But I shall go on). /S ensures all your files are processed and /D ensures all your folders are processed.
So. Yeah that’s it.
Thanks for reading. Thanks for saying ‘Nice one mehn!‘. And thanks for saying ‘Hiss, I knew that‘.
PS. This regular guy has a name. But I liked the ring to Regular Guy.
So I’ll remain Regular Guy anytime I’m on this site.
Cheers all

Monday 9 May 2016

How I Prevented HTTP 508 Error On My Site?

How I Prevented HTTP 508 Error On My Site?

error 508 fixShort Bytes: This is a simple and real account of how I prevented 508 resource limit error on my personal blog. How it all began and how I ended up learning small yet very significant things otherwise I never had learned them.
For the past few months, I had been seeing a lot of attacks on my personal traveling and trekking blog. Thanks to the WordFence Security WordPress plugin which now and then kept me informed about the attacks on my site with emails.
Here is a screenshot of an email and I was getting almost more than a hundred of these every day.
Wordfence plugin wordpress
Well, I was scared a bit initially because I hardly knew much about the WordPress security, like most of the common WordPress users. But little did I know that I was soon going to learn about the same in coming days.
I became email blind after a few days, regularly staring at the same emails and I had totally put in my trust on plugins to provide me security. But I was missing the fact that none of the security plugins were paid. Though WordFence had the advanced blocking and filtering options but most of them are available to the paid users.
On 29th of March, I suddenly began seeing an unusual spike in my traffic on Google Analytics. Well, I was skeptically happy. But I also felt a spike in the number of emails from WordFence about login attempts to my site. I felt something fishy.
But I did not know what to do. By 11.30 PM, my website was dark and down. Only thing I was able to see after typing trekkerpedia.com in my web browser was the below screen:
508 http error
Even I was unable to login as WordPress admin and then my online Google hunt began for a solution to this problem. Google was flooded with solutions but none of them were working.
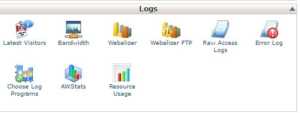
Somewhere, it was written that I should analyze my resource usage and logs. I did not know how to do that being a novice. I logged into the control panel of my site and I saw ‘logs’ section. Maybe that was the first time, I had seen that section since the inception of my blog. Also, that was the first time, I felt hopeful.
Logs wordpress
Under the logs section, I checked out for the different options and all were soaring high in the sky. I still have one of the screenshots:
Resource usage
But those screenshots were the only proof that my site was under attack and someone was using extensively using my site’s resources. But who was it and what was that person doing?
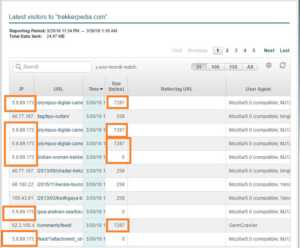
I went back to the logs sections and saw the option ‘Latest Visitors’. So, I opened that and then I saw an IP address who was downloading some data from my website regularly. Here is a screenshot of the same:
Trekkerpedia resource limit reached
So the quest which has begun around 11.30 PM ended at around 1.16 AM. Now, I had the IP address in my hand and I also knew that the person was downloading a lot of data from my website leading to the limitation of the resources.
You can see that IP address marked in the above pictures. But the bigger question was how to stop that guy from doing so?
I did IP lookup for that IP address over the internet and I was only to find just a few details about him. Like his location, country, organization etc. But those handful of details were still insufficient for me.
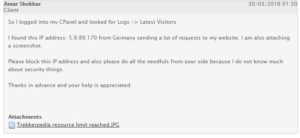
At around 1.30 PM, I decided to mail my hosting service lamenting my technical grieves. Here is one of the emails:
Mail
In the meanwhile, I was also looking for how to block IP address on my site. Most of the solutions involved admin login which was unavailable to me.
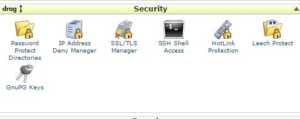
I was waiting for a reply but there was no luck for next one hour. So, I finally decided to explore the control panel on my own. And I finally was able to find IP Address Deny manager under the security section.
IPaddress Deny manager
After adding that IP address, my website was back up and I was still sitting in front of my site checking other functionalities for next half an hour.
Next morning, I realized that I did nothing great in terms of securing my site, it was just a fluke that I got the right steps within hours to set things right. However, had I just be sitting or depending upon some tools or service provider or someone whom I knew better in these terms, I surely had not learned and had wasted more of my time.
Ultimately, I learned never to give up with even those things which you do not know. Here is a link to my travel blog if you want to take a look at:trekkerpedia.com

backup or clone apartion in hard diskin kinux os

How to Backup or Clone a Partition in Linux

 1Here is how you can clone and back-up important partition on Linux PCs/Tablets
Backing up your data is a way to ensure that your important data will be safe against unplanned situations. This can be achieved by numerous ways. One can either use methods native to the Operating system or use software utilities .
Linux is an OS which is loved by computer professionals worldwide. Linux users like to partition their HDD and format them to different file-systems .
Linux provides two built in ways- use of dd and cat commands for cloning one partition to another. I’ll discuss each of them and at the end enlist some GUI based software utilities.
Cloning a partition using dd command
The dd command is a simple, yet versatile and powerful tool. It can be used to copy from source to destination, block-by-block, regardless of their filesystem types or operating systems. A convenient method is to use dd from a live environment, as in a Live CD.
( Be careful in choosing values for “if” and “of” attributes. Interchanging values will format your source partition and you will end up with loss of data.)
Cloning a partition
From physical disk /dev/sda, partition 1, to physical disk /dev/sdb, partition 1.
# dd if=/dev/sda1 of=/dev/sdb1 bs=64K conv=noerror,sync
You can also clone entire HDD by using:
# dd if=/dev/sdX of=/dev/sdY bs=64k conv=noerror,sync
This will clone the entire drive, including the MBR (and therefore bootloader), all partitions, UUIDs, and data.
Note that:
>> “if” stands for input file while “of” stands for output file.
>> “noerror” instructs dd to continue operation by ignoring all the read errors(default is to halt at an error).
>> “sync” fills input blocks with zeroes if there were any read errors, so data offsets stay in sync.
>> bs= sets the block size. Defaults to 512 bytes, which is the “classic” block size for hard drives since the early 1980s, but is not the most convenient. Use a bigger value, 64K or 128K. Also please read this before proceeding with bs:
The dd utility technically has an “input block size” (IBS) and an “output block size” (OBS). When you set bs, you effectively set both IBS and OBS. Normally, if your block size is, say, 1 MiB, dd will read 1024*1024 bytes and write as many bytes. But if a read error occurs, things will go wrong. Many people seem to think that dd will “fill up read errors with zeroes” if you use the noerror,sync options, but this is not what happens. dd will, according to documentation, fill up the OBS to IBS size after completing its read, which means adding zeroes at the end of the block. This means, for a disk, that effectively the whole 1 MiB would become messed up because of a single 512 byte read error in the beginning of the read: 12ERROR89 would become 128900000 instead of 120000089.
If you are positive that your disk does not contain any errors, you could proceed using a larger block size, which will increase the speed of your copying several fold. For example, changing bs from 512 to 64K changed copying speed from 35 MB/s to 120 MB/s on a simple Celeron 2.7 GHz system. But keep in mind that read errors on the source disk will end up as block errors on the destination disk, i.e. a single 512-byte read error will mess up the whole 64 KiB output block.
If everything goes as planned, this will cmone your partition to the target partition.
Lets talk about the “cat” command
Follow these steps to get the job done:
1.
# cat /dev/sda1 /dev/sdb1
(first attribute is source partition and second one is the destination partition.
2.
After this the cloned partition has to be mounted to /mnt and both mount point directories are listed to check if any files are missing.
# mount /dev/sdb1 /mnt
# ls /mnt
# ls /boot
3.
Now you can compare the original partition with /mnt to confirm that cloning has been successfully completed.

Software Utilities

These are available either as commercial tools or free tools:
In case you face any problem, feel free to ask in the comments, we’ll resolve ASAP.