Monday 22 August 2016

blue scree error want to know about it

What is the Blue Screen of Death in Windows – The Complete Guide

bsod
BSOD or “Blue Screen of Death” is an error message displayed on the screen when Windows OS fails to keep up to its promise of working smoothly without errors, basically, when the operating system crashes due to some reason it shows a Blue Screen of Death.
Let’s know about the Blue Screen of Death:

Where it all started?

If you ever try to Google about who created  Blue Screen of Death? You’ll be presented with the name of Microsoft’s ex-CEO Steve Ballmer, but it is not so true as Google thinks, all because of a misinterpretation of a writing by Raymond Chan titled, “Who wrote the text for Ctrl+Alt+Delete in Windows 3.1?”, reported by all major journals like The Verge, Engadget, Business Insider, DailyTech on September 4, 2014.
The writing was about the fundamental task manager software that came into existence with Windows 3.1, and interface similar with that of the  Blue Screen of Death, maybe this was the reason for the misinterpretation. Although, Raymond realized the mistake, and criticized BGR.com for having “entirely fabricated a scenario and posted it as real”, in a publishing on September 9, 2014
BSODs have been there since the time of Windows NT 3.1, and have made their appearance in subsequent Windows versions, as more advancement led to more frequent crashes, OS instability issues, especially in the Windows 9x series, which experienced the most number of BSODs, all due to incompatible DLL files and Kernel bugs.

What causes Blue Screen of Death?

The official name for BSOD is STOP error, caused when kernel level software run into some problem, and it becomes an inevitable scenario without performing a system restart. BSODs generally are an outcome of hardware related errors in a device.
A  Blue Screen of Death screen represents an error code and a custom name assigned to it along with some text written. It may be due to secret actions by some programs we call malware or by some corrupt file in the system, finally leading to a system crash and eventually losing all data in some cases.
Windows creates a minidump file, which stores all the information about a Blue Screen of Death event. Windows uses this minidump file to find solutions to the cause of it. You can use the Windows Event Viewer to see the BSOD information. Later versions of Windows include a complete dump file in which all the contents of memory are copied into the dump file.

Fight with the Blue Screen of Death:

Find out the Malware: Maybe the real culprit causing your system to crash is the malicious software hiding inside your computer. Scan and remove these malware if you encounter frequent Blue Screen of Deaths.
Update the drivers: Always blaming the Malware guys for anything wrong with the device is not good manners, maybe the drivers responsible for the smooth functionality of the hardware become the cause of BSODs. Corrupt driver files can cause BSODs and force your system to perform a restart operation. So, if you see frequent BSODs, do not hesitate to update the drivers.
Boot to Safe Mode: If your device has frequent BSODs then you should boot into the safe mode and check whether the problem persists. You can point out the driver causing the problem as Windows loads only the essential services in the safe mode.
Use System Restore: Shifting your device back to a previous state can be beneficial in such cases as it may remove the cause of Blue Screen of Death.
Hardware Check: Check for memory errors using built-in tools on your machine. Check if the device is having high-temperature levels, use Speccy by Piriform to do so. Faulty hard drives can cause BSODs on a machine. Consult a hardware technician if your memory and temperature are fine, your device may have some other issue.
Reinstall Windows: This is the Lazarus Pit for your Windows on the verge of death.  If you can’t come up with a solution for the BSODs on your machine, then just reinstall your Windows OS get to rid of all those death threats your machine receives every now and then.
Blue Screen of Death has been there and will continue to haunt you. You must prepare yourself a warrior and fight back with an equal force. Show the Blue death, what you are, and what are you capable of, be the savior for your machine.
Okay now, no more heroic thoughts, just keep a bunch of things in mind. Always keep your PC updated, regularly scan for malware and hardware issues, think twice before installing an unknown software, and NEVER turn off your machine directly from the power source as it may corrupt your Windows files. Coming back to the heroic thoughts, be the real hero and take down the Blue Screen of Death.
Know more about the history of BSOD:

want to become a android developer follow


Become an Android Developer : Here is how you can create your first Android App

Follow this 7 step guide to create your first Android App

android is basically a operating system ina a mobile which is based on java ad linux if you want to program a android app you have to do the following and simple steps

Programming Language

Android apps are developed in Java. You do not need to be an expert, but you should be good in specific areas, e.g. you need to have good knowledge of AWT and Swing for developing a GUI for your app. Getting easy with following topics before starting will make the development phase more enjoyable.
>> Event Handling.
>> Swing.
>> Constructors.
>> JDBC.
>> Classes, Objects and Methods.
>> Packages.
>> Abstraction.
>> Polymorphism.
>> Inheritance.
You’ll also need to learn basics of the Extended Markup Language(XML).

Places to Learn From

You can Learn Basics of Java and Android Development from these websites.
1. TreeHouse
2. Tutorials Point
3. Udacity( Android development for beginners)
4.Youtube
5.EdX

Steps to get an app built

1. Ideation

First of all an idea is required to be worked on. You’ll need to have a clear view of what your app will be for and what it will do. A good idea will be to start small and gradually add sophistication. Don’t make it so boring that you don’t want to make it but try to avoid any complex functions as far as possible. Ideally, the app will only require one ‘screen’ (activity) and will involve some simple interactions so that something happens when the user presses a button. Consider it a challenge to make something that’s genuinely useful with the minimum amount of code.

2. Choosing your IDE

The most common way to build Android apps is to use Android Studio and Java. This is the official method recommended by Google and it will afford you a lot of flexibility while ensuring there’s plenty of support if things go wrong. This is also the method you will need to know if you ever plan on becoming a professional developer.
There are numerous other options for your IDE and language too however. You may pick Unity and C++ for instance if you want to make a game. Basic4Android is an IDE focused on rapid development that lets you code with BASIC rather than Java. There’s even an IDE that runs on Android called AIDE.

3. Collecting Resources

Resources mean images and other material you will use in your app. You can download numerous images and use them but be aware not to violate someone’s copyright.

4. Building the layout of your app in IDE

Now you’re going to create your layout in Android Studio using the ‘designer’. This is a tool that lets you simply drag and drop the widgets (also called ‘views’) where you want them on the page. You’ll need to start a new project in Android Studio to do this but there will still be no coding necessary at this point (except maybe a little XML). To start a new project select File > New > New Project. Follow the steps selecting a name for your project and for your activities and choose ‘Empty Activity’.

5. Writing the core code

Now comes the more challenging part – adding the code. You know the basics of Java and you have your widgets/views already in place. Now you’re going to open the Java file for your main activity and simply create some ‘onClick’ events to add code that will run only when users click a specific button or otherwise take a specific action.

6. Implementing more complexity

By now though, you should have some of the basic functionality in place so that your app responds to button clicks (in one way or another) and perhaps stores some variables.
Next is to add the more advanced functionality that will be specific to your app. For example, you might want your app to play music when a button is clicked. Maybe you want to add some flashy animations. Or perhaps you need to know how to transition from one activity to the other.

7. Final review and publishing

Now comes the last step. You’ll have to test your app for bugs and once everything is right you can get your app published on Google Play Store.

windows registry and it uses

What Is Windows Registry And How To Use It????what is windows registry

what is windows registry
 The Windows Registry could be considered a big collection of all the details about your computer. It has information about the installed programs, DLLs, your shortcuts and icons, user information, driver configurations etc. If you need to make any changes to your Windows Registry, you are advised to make a backup and then play with Registry Editor. You can access it by running re The Windows Registry could be considered a big collection of all the details about your computer. It has information about the installed programs, DLLs, your shortcuts and icons, user information, driver configurations etc. If you need to make any changes to your Windows Registry, you are advised to make a backup and then play with Registry Editor. You can access it by running regedit.exe command in Run.

What is Windows Registry?

Windows Registry is often called the most mysterious tool on a Windows PC. If you know how to use it properly, it can prove to be a very powerful tool. The Windows Registry is basically a collection of databases of different configuration settings in Windows operating system.
According to official Microsoft Computer Dictionary, registry is:
A central hierarchical database used in Microsoft Windows 98, Windows CE, Windows NT, and Windows 2000 used to store information that is necessary to configure the system for one or more users, applications and hardware devices.
It’s basically a collection of nearly everything, from settings and preferences of your system to user passwords and user interface. It can also be thought as a kind of DNA for the Windows operating system.
It keeps the data that’s used by a Windows operating system while running. It mainly covers:
  • User profiles
  • Folder and program icons properties
  • Information about the used ports
  • Driver configuration
  • Information about installed programs
The Registry replaces the text-based .ini files that were used in Windows 3.x and MS-DOS configuration. These text files have been ditched for a faster and unified registry. If we compare different Windows operating systems, the Registry is common but there are some differences among them.

How to make changes to the Registry?

You can access your Windows Registry using the Registry Editor program regedit.exe. To launch this tool, you just need to hit Win+R, type regedit.exeand hit Enter.
Now you’ll be presented with a tree view of different keys on the left-hand side with their values on the right. This Registry Editor is the face of the registry that lets you makes changes. It contains different registry value that are located within registry values–all within different registry hives.

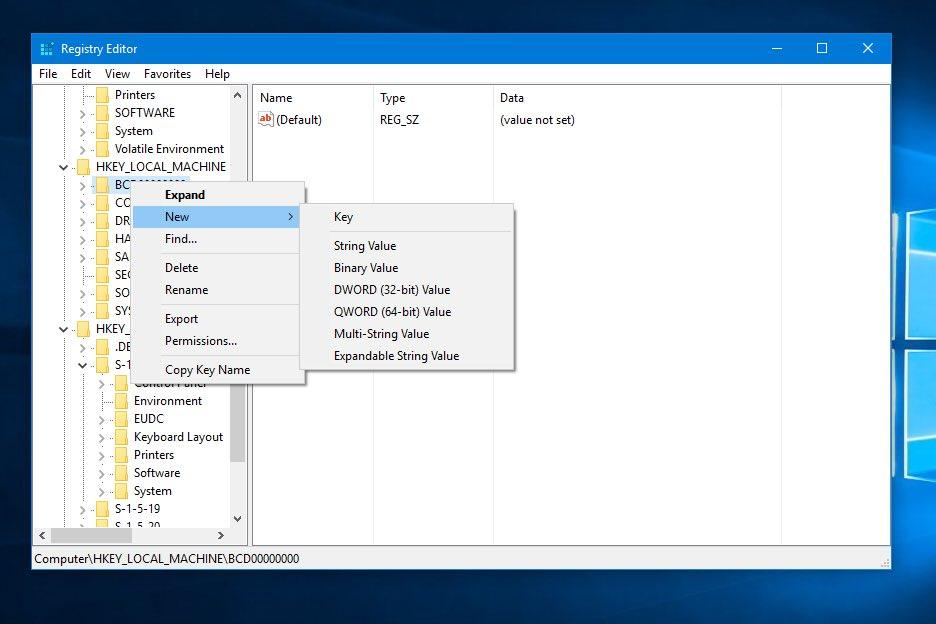
How to add new Registry Keys and Values:windows registry Adding new values

After opening the Registry Editor, you need to locate the registry key that you want to add another key to. Now you can add a new registry key or a new registry value:
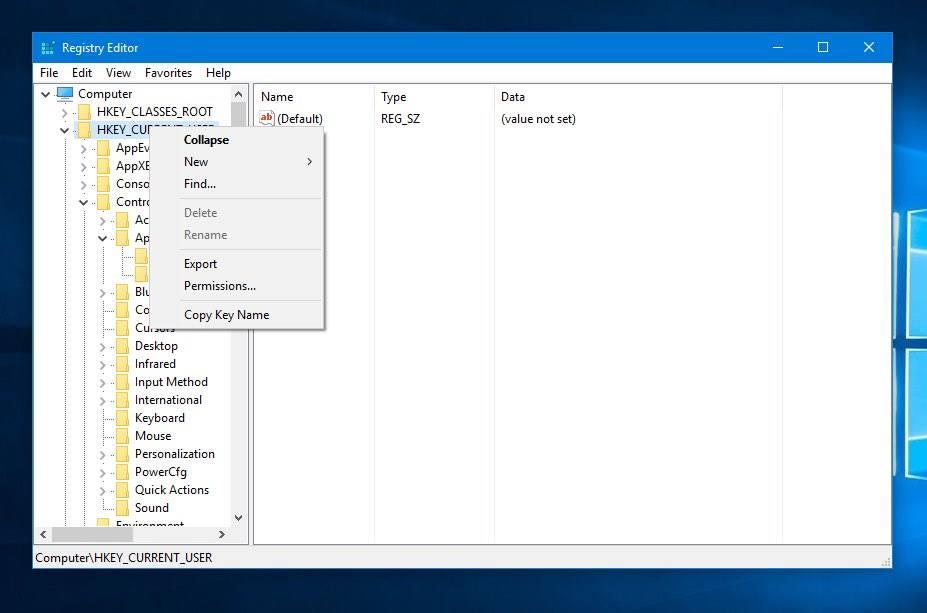
  • To create a new registry key, you need to right-click/tap-and-hold on it. You’ll see an option New > Key. Here, name the new key and press Enter.
  • To create a new registry value, you need to right-click/tap-and-hold on it. You’ll see an option New that would be followed by the type of value you wish to create. After naming the value, press Enter to confirm. Now, open the newly created value ad set its Value data.

How to edit Registry Keys and Values:windows registry rename

Please note that editing any existing Registry Key or value will cause an impact on your system. So, make any changes accordingly.
After opening the usual regedit.exe window, on the left-side of the Registry Editor, locate the registry key that you want to rename or edit. After doing so, you can make the following changes:
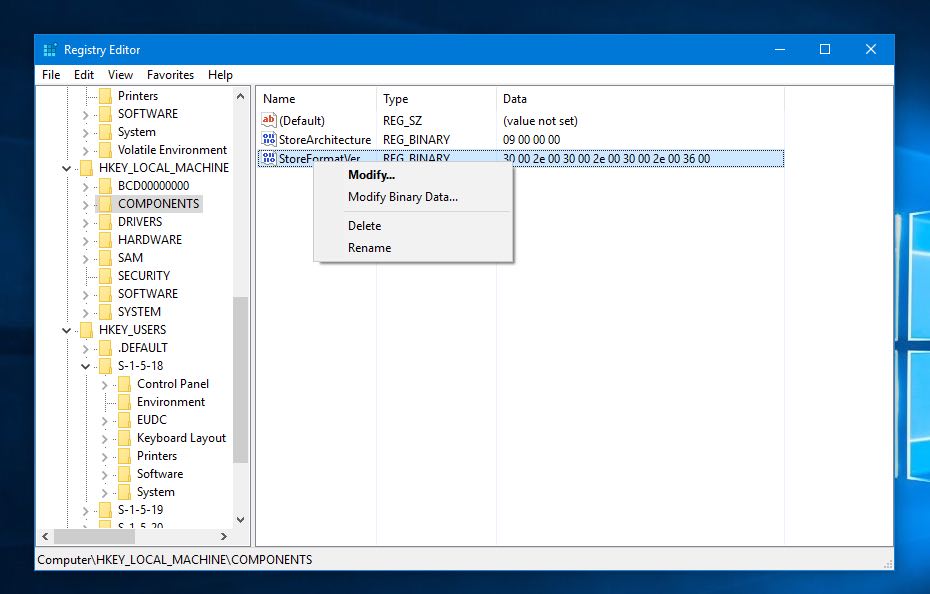
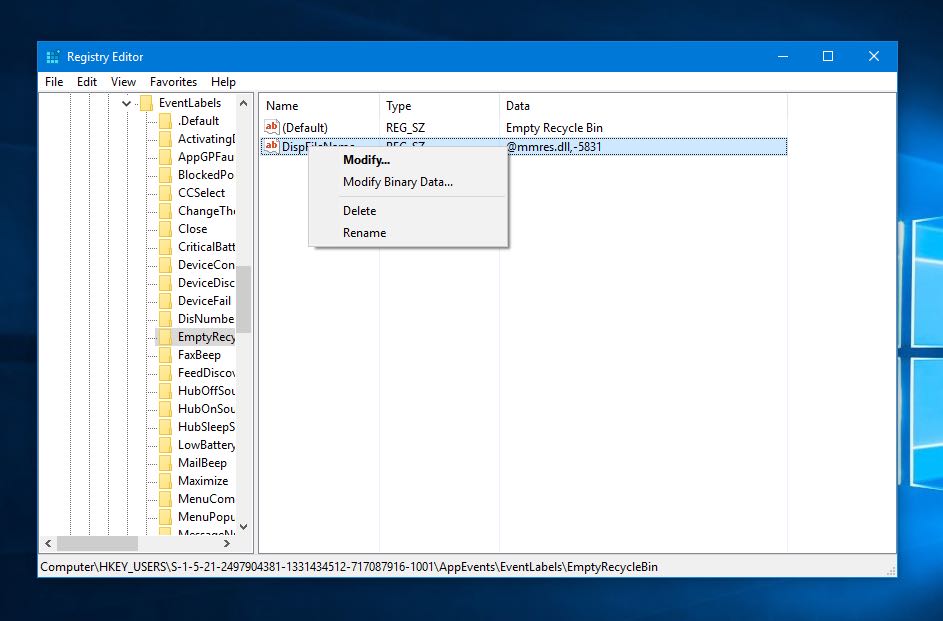
  • To rename a registry key, right-click/tap-and-hold on the key and chooseRename. After giving the registry key a new name, press Enter.
  • To rename a registry value, right-click/tap-and-hold on the key and chooseRename. After giving the registry value a new name, press Enter.
  • To make a change to a value’s data, right-click/tap-and-hold on the value and select Modify. Now, add a new Value data and press OK to confirm.

How to delete Registry Keys and Values:windows registry delete

Sometimes, you might need to delete an unwanted registry key or value that could’ve been added by some unwanted program. So, after making a proper backup, you have the option to delete Registry Keys and Values.
To do this, you need to open Registry Editor using the regedit command. Now from the left pane, locate the registry key/value that you want to delete. After doing so, right-click/tap-and-hold and choose Delete option. This will be followed by a confirmation dialogue that you need to accept and move on.

How to make a backup of Registry?windows registry export backup

Before making any changes to the Registry, your are advised to export the key in that particular registry, or back up the whole registry. If a problem occurs during making some changes, you can restore those changes and bring it back to the original state. You are also advised to avoid substituting the Windows Registry of one version with the Registry of different Windows version.
One method to back up your registry is by simply making a System Restore point. Just search for System Restore option in your Settings option or Windows search box.
However, if you are making a little change and you need to backup a single portion of the registry, simply open regedit.exe. There, find the appropriate key, access the Export feature by right-clicking and save the complete section in text file format.

How to restore Windows Registry?windows registry import restorewindows registry import restore

Just in case something goes wrong, restoring a particular registry key or value is very simple.
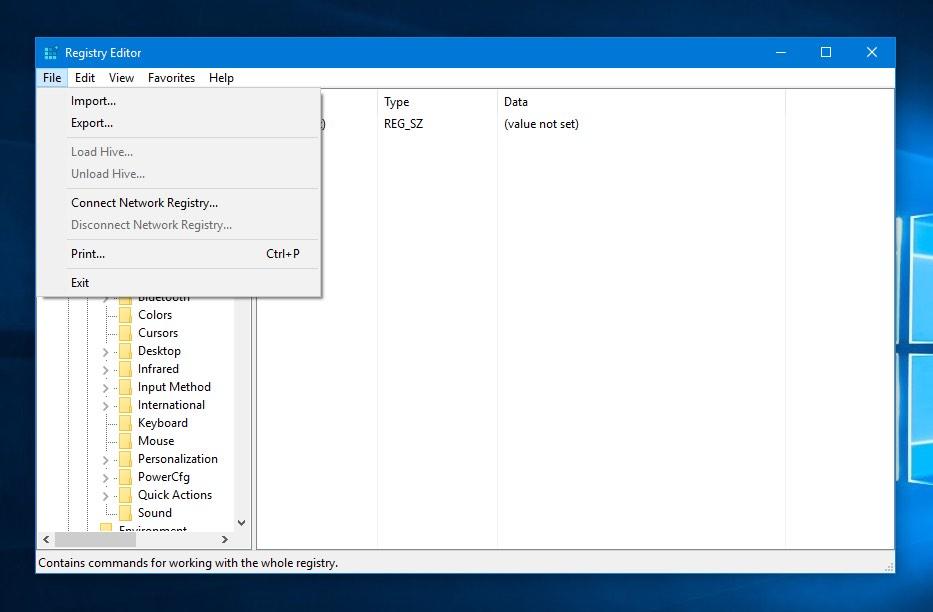
After opening the Registry Editor, you need to click File > Import. Here, in the Import Registry File box, look for the location where you have saved your backup. There, click to select the backup file and open it.

Should I clean Registry from time-to-time?

The big question is — whether a registry cleaner will speed up your PC and make it more quick and faster? Well, there isn’t an exact answer to this question.
It all depends on the effectiveness of the registry cleaner you opt to choose and the present condition of your registry. While I won’t recommend you to use a registry cleaner on a daily basis, it could prove to be useful in some cases. Let’s suppose you’ve uninstalled some program but things didn’t turn out smooth. In such cases, a good registry cleaner can help you out.

10 best anti-hacking software to protect your Windows 10 run PC from hackers


10 best anti-hacking software to protect your Windows 10 run PC from hackers 0

10 best anti-hacking software to protect your Windows 10 run PC from hackerssProtect your PC/laptops with these 10 best anti-hacking software for Windows 10

Hacking is a well-known method of remotely taking over or “crashing” your PC/laptop. Hackers are a constant threat for all Internet users. In today’s computer-dependent society, hacking has become such a problem that stronger measures must be implemented to stop hackers. While no antivirus can make your computer threat-proof, the best solution would be to use a complementary anti-hacking tool that is compatible with the antivirus software you are using, for an additional layer of protection.
In this article, we bring to you the best anti-hacking software that one can use in Windows 10, to make it difficult if not impossible for hackers to access your computer.
Given below are the best anti-hacking software products for Windows 10:

1. Windows Defender Advanced Threat Protection

Microsoft wants Windows 10 to be a tough cookie to crack for hackers due to complexity on the rise in cyber-attacks. Windows Defender Advanced Threat Protection is a software product that attempts to detect and remove malware. This tool is built on the existing Windows 10 security defenses, and offers a better post-breach layer of protection. It identifies the threats that have circumvented defenses, and provides response references as well.
Currently, Windows Defender Advanced Threat Protection is available for Windows 10 Enterprise, Windows 10 Enterprise for Education, Windows 10 Pro, Windows 10 Pro Education, and is already running on Insiders’ computers. This feature is expected to be made available by Microsoft to all Windows 10 users in the near future: “We encourage our customers to upgrade to Windows 10 for our most advanced security protection, with the opportunity to take advantage of Windows Defender Advanced Threat Protection when it becomes available more broadly this year.”
If you are running a Windows Pro or Enterprise version, go to Windows Defender’s portal, sign in and download the Advanced Threat Protection feature.

2. Reason Core Security

This security tool removes malware and adware that your standard antivirus has missed. Reason Core Security offers real-time protection, stopping unwanted programs from being installed with software you download. Thanks to its multi-layer structure.
Other features include:
• Reason Core Security it’s quiet and unassuming, and won’t slow down your computer or eat up unnecessary resources.
• You are always protected against the most recent threats with cloud-based scans.
• Protects your web browser from adware extensions.
You can download the free standard version of the tool from here.

3. Enhanced Mitigation Experience Toolkit

Microsoft’s Enhanced Mitigation Experience Toolkit (EMET) is a freeware security toolkit for Microsoft Windows. It provides a unified interface to enable and fine-tune Windows security features. The most common actions that hackers might use to access your computer are anticipated by this security feature, which is defended by diverting, ending, blocking, and canceling those actions. The main advantage is that it can be used as an extra layer of defense against malware attacks, after the firewall and before antivirus software.
Also, EMET works well with most commonly used home and enterprise third-party applications, protecting every file on your computer. This security tool can be downloaded from Microsoft for free.

4. SUPERAntiSpyware

SUPERAntiSpyware is a powerful anti-hacking tool that can detect and remove spyware, adware, trojan horses, rogue security software, computer worms, rootkits, parasites and other potentially harmful software applications. The repair system of this utility quickly enables the apps disabled by malware programs. Detailed logs are provided after each scan. Even though it can detect malware, SUPERAntiSpyware is not designed to replace antivirus software.
You can either use the free version of SUPERAntiSpyware from here.

5. Anti-Hacker

By patching many of the existing Windows security issues, this free tool is designed to ensure that it very difficult for hackers to access your computer.
The following features are offered by Anti-Hacker:
• Disables “Run as Administrator” vulnerabilities.
• Cleans your computer privacy.
• Starts startup scanner.
• Identifies and removes keyloggers.
• Patches user account control for 3rd-party firewall software.
• Blocks PayPal donations spam.
You can download Anti-Hacker from here.

6. Trojan Remover

Trojan Remover is designed to automatically remove malware (trojans, worms, adware, spyware, etc.) from a PC when standard anti-virus software has either failed to detect the malware or is unable to effectively eliminate it. It can also detect and disable/remove malware hidden using rootkit techniques. Trojan Remover also removes the additional system modifications the malware may have made.
Other features include:
• Trojan Remover pops up an alert screen for each identified threat showing the file location and name, and offers to remove the program’s reference from the system files.
• You can browse individual files and directories from within Windows Explorer.
• The tool automatically re-starts your system and completely disables the threat on finding out malware that is memory-resident.
Trojan Remover is available for free for a 30-day period. You can either purchase it for $24.95 or uninstall it thereafter.

7. Malwarebytes Anti-Malware

Malwarebytes Anti-Malware (MBAM) is an application for computers running under the Microsoft Windows and Apple OS X operating system that finds and removes malware. It is available in a free version, which scans for and removes malware when started manually, and a paid version, which additionally provides scheduled scans, real-time protection and a flash memory scanner that will make your computer almost threat-proof.
What to expect from Malwarebytes Anti-Malware:
• Avoids access to and from known malicious webpages.
• Prevents malware from ending Malwarebytes or transforming its processes.
• Identifies malware automatically in real-time, before it can pass on to the system.
• Allows you to schedule automatic scans and database updates.
• Scans faster by only looking for active threats.
You can try out  Malwarebytes Anti-Malware from Malwarebytes for free from here.

8. HitmanPro

HitmanPro is a portable antimalware program, which aims to detect and (if found) remove malicious files and registry entries related to rootkits, trojans, viruses, worms, spyware, adware, rogue antivirus programs, ransomware, and other malware from infected computers. Hitman Pro is a free second opinion tool, which delivers confidence in a world where computers that are considered are compromised on a regular basis.
Since HitmanPro doesn’t depend on virus signatures, it is very successful as it gathers actionable intelligence and scans the collected information to identify which files act and look like malware. The tool looks for unethical file behaviors because it is a lot difficult for malware creators to drastically change the manipulative behavior of their malware.
Other features include:
• HitmanPro is a signature-less on-demand malware scanner of just 10 MB and doesn’t need installation. It can be started directly from an USB Flash Drive, CD/DVD, or network attached storage.
• It removes persistent threats from within the running operating system and exchanges infected Windows resources with safe original versions.
• It is a fast, typical malware scan with HitmanPro takes less than 5 minutes.
• You can download HitmanPro 3 from Sophos. HitmanPro offers home users a free one-time license, valid for thirty days.

9. McAfee Security Scan Plus

McAfee Security Scan Plus is a free diagnostic tool that safeguards your computer by actively checking for up-to-date antivirus, web security software, and firewall. It also scans for threats in any running programs.
Other features include:
• Silently installs and updates in the background and does not interfere in the productivity.
• You can customize scan frequency. Three alert options are provided to the user by the scheduled scan: Scan Now, Cancel, Remind me later.
• Identifies malware, trojans, and possibly unwanted programs in running processes and modules loaded by these processes. It also scans browser history and cookies.
You can test the tool on McAfee’s website.

10. Spybot Search & Destroy – free edition

Spybot – Search & Destroy (S&D) is a spyware and adware removal computer program compatible with Microsoft Windows 95 and later. It scans the computer hard disk and/or RAM for malicious software. It can repair the registry, Winsock LSPs, ActiveX objects, browser hijackers and BHOs, PUPs, HTTP cookies, trackerware, heavy duty, homepage hijackers, keyloggers, LSP, tracks, trojans, Spybots, revision, and other kinds of malware. It can also delete tracking cookies. Additionally, it has an Immunize function to block the installation of spyware before it occurs e.g. by making changes to the hosts file.
If you are already running Windows Defender, and you want to download the free edition of Spybot Search & Destroy, Windows will disable the tool because it comprises of antivirus components from the paid editions. The best solution is to disable Live Protection Spybot, enable Real-Time Protection in Windows Defender, and disable Windows Defender periodically to scan your system using Spybot.

Tuesday 9 August 2016

How to Enable “Stereo Mix” in Windows and Record Audio from Your PC

How to Enable “Stereo Mix” in Windows and Record Audio from Your PC


banner
now a days you need some software that configures many complex operation of sound amplifying
you need to pay or may not to pay for those softwares there are some techniques that are useful for that ype pf softwares  which is i default option
Ever need to record something on your computer exactly as it comes out of your speakers?  Enabling “Stereo Mix” will let you do exactly that, and here’s how to do it.
Nowadays, most sound cards have the ability to record whatever is being output.  The only hang-up is accessing that recording channel, which can be done rather easily.

Go down to the audio icon in your system tray, right-click it, and go to “Recording Devices” to open up the proper settings pane.
stereo_mix_01
In the pane, right-click on a blank area, and make sure both “View Disabled Devices” and “View Disconnected Devices” options are checked.  You should see a “Stereo Mix” option appear.
stereo_mix_02
Right-click on “Stereo Mix” and click “Enable” to be able to use it.
stereo_mix_03

In some cases, your audio chipset drivers aren’t helping your cause.  Most likely, this is because they’re outdated.  In other instances, however, it’s because the newest Windows drivers for your chipset don’t support this feature.  This was the case on my Asus Eee PC (a 1000HE), but I got around the issue by downloading and installing the older Windows XP/Vista drivers for my audio chipset.  As always, before changing your drivers, make sure create a system restore point in case things don’t go as planned.

With “Stereo Mix” enabled, you can open up your favorite recording program and select that instead of your microphone before you record.  If you don’t see the option, or your program doesn’t give you the ability to change the recording device, you can disable or unplug your microphone and make “Stereo Mix” the default recording device.
stereo_mix_04
This works well for when you want to capture audio for a screen-sharing session, or record audio from streaming sources–such as live web-casts–that don’t necessarily allow you to download content immediately.  In order to do that, you’d open up your audio recording application of choice (like Audacity), and find the option for microphone input. Select Stereo Mix as your input (if it isn’t already), be sure other recording devices are muted or disabled, and click record.
audacity
Be sure to check out our article, The How-To Geek Guide on Audio Editing: The Basics, to learn how to use Audacity.